Hula Hoop Experiments

This summer I fell in love with hoop dancing and have been brainstorming fun ways to combine hooping and soft circuits.

Most of us have seen the fancy LED and fire hoops that make for great performances, but can it be taken a step further and have truly interactive hoops? Here are a few projects I’ve found that bring hooping to a whole new level. At the end of the post I’ve included documentation of some of my own early prototypes.

Lighting/Visual Effects

Uber Hoop


Christian Miller created the Uber Hoop – “The world’s most technologically advanced hula hoop! Features fully controllable RGB LEDs, a MEMS accelerometer and gyroscope, an embedded Arduino, and Bluetooth for wireless communication. The result is a hoop that responds to your motions and dazzles with beautiful light patterns!”

Fiber Optic Hoops

I’ve seen a lot of LED hoops, but fiber optic lighting is a fun twist. This one isn’t interactive, but still captivating to watch.

Controllers – Media and Music

Hula Rhythm

HulaR.jpg
Images courtesy of Interaction Lab at Holon Institute of Technology

Images courtesy of Interaction Lab at Holon Institute of Technology


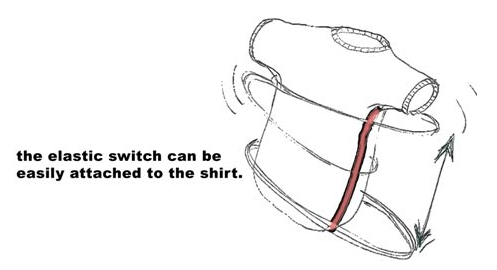
This project concept from the Interaction Lab at Holon Institute of Technology utilizes an elastic preassure sensor on the body to register the rotation/pressure of an ordinary hula hoop and translates it into a musical game.

Hip Disc

Image courtesy of Hooping.org

Image courtesy of Hooping.org

The Hip Disc uses conductive fabric on the edge of two hoop-like discs to trigger music. Not quite hooping, but it is an interesting new way of controlling music with your body.

Musical Hula Hoop – Fact or Fiction?

Hooping.org has a great article on the future of sound making/controlling hula hoops.

Anossens: The Game and The Reality

I really like this use of a hula hoop as part of an interactive game/live show created using Processing and webcams.

Data Logging

Smart Hula Hoop

Image courtesy of Electronic Products.com

Image courtesy of Electronic Products.com


The Smart Hula Hoop, created by a team of students from National Yunlin University of Science and Technology, uses an iNEMO board to “to transform the standard hula hoop into a complete healthcare sports monitor system. They did this by accessing and fusing together output data provided to the iNEMO by its on-board accelerometer (measures gravity and acceleration), e-Compass (measures absolute heading orientation), and gyroscope (measures angular velocity during exercise.)”

My Prototypes

I’m particularly interested in POV toys and if they can be successfully installed on a hoop in a seamless way. I’ve been talking with Instructables author Quasiben (who made a nice and simple Arduino POV) about creating a hoop that you can send text to through a smartphone and change the graphics on the fly. The video below is my first test to see if the hoop rotation was fast enough to display the text properly. Next step is to get the hardware into/on the hoop in a more permanent, clean way (right now it is just taped on the surface).

My other experiments have been playing with the idea of the hoop itself being a trigger, with most of the electronic components residing mostly on a garment. This solves the problem of bulky tech in such a small space. I’ve glued some conductive fabric tape on the inside of one of my hoops and have then been using patches of conductive fabric on various shirts as contact points. When hooping across these areas, the hoop acts as a switch.

Many hoop dancers use music with their performances, so what if you were able to create the music based on your movement? I’m experimenting with a beatbox drum machine toy to see if I can get some interesting flow happening. I’ll be bringing my prototypes to the Hoopium hoop jams to talk with more advanced hoopers about placement of electronics and feedback. Stay tuned!

http://www.flickr.com/apps/slideshow/show.swf?v=109615


Crochet Sensor Experiments

Here are a few tests of crochet stretch sensors (and some more knit sensors for comparison) as I try to determine the method that works best for me. I did a few experiments with crocheted vs knit sensors, conductive yarn vs conductive thread, and felted vs non-felted, and using elastic thread to see how each variation of the sensor would compare to the others.

I made a felted crochet stretch sensor following Felted Signal Processing’s Instructable – their method uses elastic thread to help add stretch and regular conductive thread along with wool yarn.

CrochetSensor1.jpg

It was a little tricky keeping track of 3 strands while crocheting, and you can see from some of my pictures that I dropped a few stitches in places. I could only find the elastic thread in 11 yard spools, and these sensors (between 11″ and 15″) took about two spools each to complete. This type of sensor took more time and materials than the spool knit samples I made, but had a nice solid feel to it.

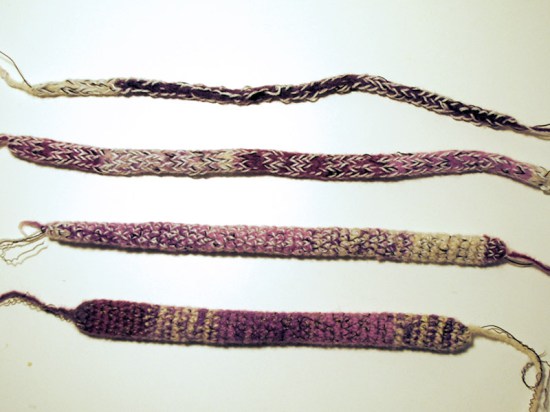
I was interested to see how felting the conductive yarn and knitted sensors would compare with the original sensor trials I had done, so I made a few more with variations. Here are the sensors before felting (from top to bottom):
A: Knitted sensor on 3 pin Wonder Knitter w/ elastic thread, wool yarn, and conductive yarn
B: Knitted sensor on 6 pin Wonder Knitter w/ elastic thread, wool yarn, and conductive yarn
C: Crochet sensor w/ elastic thread, wool yarn, and conductive yarn
D: Crochet sensor w/ elastic thread, wool yarn, and conductive thread

CrochetSensor2.jpg

Here’s a side by side comparison of a felted sensor and the others ready for felting.

CrochetSensor3.jpg

And all the finished sensors.

CrochetSensor4.jpg

So how did they compare? Here is a chart of my results:

Sensor Resting Length Resting Resistance Stretched Length Stretched Resistance
A 15″ 2.5 M ohm 20″ 12 K ohm
A (felted) 12.5″ >20 M ohm 14.5″ 3 M ohm
B 17″ 3.3 M ohm 22.5″ 4 K ohm
B (felted) 13″ >20 M ohm 15″ 2 M ohm
C 11.5″ 2.8 K ohm 13″ 1.2 K ohm
C (felted) 10″ 1.7 M ohm 13″ 1.3 M ohm
D 11″ 20 ohm 13″ 15 ohm
D (felted) 9.5″ 38.5 ohm 11″ 35 ohm

The crochet sensors, while nice and sturdy, weren’t really all that stretchy. I also noticed that they didn’t bounce back, and over time would stretch longer and longer. Maybe a different type of elastic would help with this issue.

The conductive thread sensors also need to be very long in order to get a large range of values, so I think the knit sensors with conductive yarn will be the way to go for hooking up to a drawdio.

Making Knit Stretch Sensors

This week my order of Nm 10/3 Conductive Yarn from Plug and Wear arrived. I immediately started making some samples of the knit sensors I blogged about a few weeks ago.

Following Hannah Perner-Wilson’s tutorial/method, I made two sensors using a Wonder Knitter from the craft store. It came with two attachments, a 3 pin and a 6 pin to make a thinner and thicker knit tube.

Yarn.jpg

After making two knitted sensors with a combo of acrylic yarn and conductive yarn, I made my own knitting spool out of an old thread spool and some nails. I used some sock weight yarn in a similar thickness to the conductive yarn and made a nice thin sensor.

Yarn2.jpg

Here are the three sensors I made side by side. They are about 15 inches long with tails to connect the conductive yarn to alligator clips for testing.

Yarn3.jpg

Resistance readings from my multimeter:

  • Sensor C: 6 pin knit on Wonder Knitter – Resting 4.45 M ohm, Stretched: 10 K ohm
  • Sensor B: 3 pin knit on Wonder Knitter – Resting: 3.9 M ohm, Stretched: 10 K ohm
  • Sensor A: 3 pin custom spool knitter and sock weight yarn – Resting: 1.0 M ohm, Stretched: 10 K ohm

After doing some more tests, I’m going to start prototyping a knit version of my Musical Drawdio Puppet using the sensors as the tentacles so that you can ‘play’ it by pulling on them.

I’ve also been teaching myself to crochet and will be trying out more techniques soon. I made a crochet button using the example on How To Get What You Want.

Yarn4.jpg

Hooking the sensors up to an LED to control brightness:

Exploring Make: Projects

A few weeks ago, Makezine & Craftzine introduced a new DIY platform called Make: Projects. Soon after the site launched, I jumped right in and started posting some of my project tutorials and playing around with the system.

MakeProjectsSite.jpg


Make: Projects is a living library for makers, a how-to community hosted by MAKE magazine! Here you can build something from our growing cookbook of projects, tweak existing projects to improve them, share your own step-by-step instructions, discover new ideas and techniques, and learn how to make just about anything. And it’s a wiki, so everything is hackable. Connect with the collective smarts of the maker community!

Interface and Features

When you create a new guide, it is broken into three sections that you edit separately:

  • General Guide Data – input a title, choose a category for your guide, intro text, and a one line summary (that displays when browsing projects).
  • Meta Data – display approximate time & difficulty of the project, prerequisites, and list the tools/materials needed.
  • Steps - the ‘meat’ of the guide, where step-by-step instructions and images go.

Tools Database

A really cool feature of the platform is the tools and material database in the Meta Data section of the guide editor. As you start typing a tool into the box, the database searches for it and you can choose from a drop down list. If the tool you input is not in the list, it gets added to the database, building a larger collection of relevant materials.

Template

The steps pages are created in a specific template, broken down into bullet points with icons that can be added for notes or reminders. This forces you to keep the steps short and to the point. As I was inputting tutorials I had previously published on Instructables, this constraint helped me clarify and condense instructions and make them easier to follow.

Images

One of my favorite aspects of the platform is the image tray. A pop up at the bottom of the screen, you can upload a bunch of images and drag and drop them into different sections of your guide. Once you use the image it is removed from the tray, but can be dragged back into it for rearranging.

Make: Projects vs Instructables

So how does the Make: Projects platform compare with the well known Instructables? It is hard to compare them side-by-side as they are essentially about different things. Make: Projects appears to be more of a library of tutorials introduced in Makezine and Craftzine, with the ability for users to contribute their own projects. It has more of a database/magazine feel and is for browsing, editing, and using as a reference. The strength of Instructables lies in its community and social emphasis on making. There are forums, comments, and ratings systems to help bring the most useful or engaging content to the forefront. One major difference to note is that on Make: Projects everything must be licensed underCreative Commons BY-NC-SA, while Instructables has the option of all Creative Commons licenses. I don’t favor one over the other and publish my tutorials on both to reach different audiences. It will be interesting to see how the two sites interact with each other.

Make: Projects

Pros:

  • Standardized formatting keeps an easy to read and cohesive look/feel to the content.
  • Wiki-based editing allows for guides to be continually improved upon.
  • Curated platform helps eliminate duplicates and keeps a higher standard of projects.

Cons:

  • Only 3 images allowed per step.
  • No option to embed video (yet).
  • Some users may find Wiki formatting/syntax confusing

Instructables

Pros:

  • Thriving community adds a social aspect to the tutorials, commenting, contests and badges encourage interaction between users.
  • Tagging, keywords, ratings, favorites and subscription options to organize your own priorities andenable dynamic browsing through related tutorials.
  • Ability to add notes to images.

Cons:

  • Lots of ads can make interface crowded unless you purchase an upgraded account.
  • No rules in place for formatting or image resolution – content/quality can be hit or miss.

Click the image below to check out my author page on Make: Projects and view some of my tutorials.

[all images via Make: Projects]

DIY Tech Footwear Round-Up

Lately there are an increasing number of shoes on the market that incorporate technology, from running shoes that sync with your iPod to high fashion illuminated heels. Here are a few cool tutorials that show you how to build your own tech-infused footwear.

Light Up and Glowing Shoes

DIY Flashing Shoes

Image via Instructables

Image via Instructables

This Instructable shows you how to repurpose the electronics from a pair of kid’s light up shoes and put them into your favorite pair of sneakers.

LED Shoes

Image via Instructables

Image via Instructables

Another pair of LED shoes, this tutorial has you build the circuit from scratch using conductive thread, LED sequin beads and puff paint (for insulation and decoration). Metal snaps in the tongue creates an on/off switch.

Rodarte Style Light Up Heels

Image via I Heart Switch

Image via I Heart Switch

Alison Lewis of I Heart Switch shows you how to achieve a look inspired by Rodarte’s high fashion light up heels.

El Wire Shoes

http://blip.tv/play/gfkN7cpIAg

Diana Eng’s book Fashion Geek has a project that uses electroluminescent wire instead of LEDs to add some glow to your footwear.

Sound

Get Smart Shoe Phone

Image via Instructables

Image via Instructables

Honestly, who doesn’t want to make a shoe phone? Instructables member gardners has a series of Get Smart projects that look like a lot of fun. This one uses a mobile phone and bluetooth headset.

Beat Sneaks: Musical MIDI Shoes

Using force sensitive resistors and an Arduino, these cool sneakers translate your toe-tapping into triggers for sounds.

Motion/Other Interactions

Power Laces: The Auto Lacing Shoe

I love these ‘Back to the Future’ inspired sneakers that have been getting a lot of press lately. Great use of a servo and zip ties!

Joy Slippers

Image via Instructables

Image via Instructables

Hannah Perner-Wilson’s tutorial uses conductive fabrics to make analog pressure sensors in custom slippers. These can then act as controllers for a drawing program in the Processing environment.

Power Generating Shoe

Image via Instructables

Image via Instructables

This project hacks parts of a crank flashlight and places them in the heel of the shoe for a boost of power when you walk.

For more reading on technology in footwear check out:

Soft Circuits Outside

The last couple of weekends have been surprisingly warm and sunny for April in New Hampshire, so I’ve been trying to spend as much time outside as possible. At first I thought this would directly compete with my goal to work on soft circuit projects, but there are a lot of things you can take outdoors and piece together while enjoying the weather. When I was working on REACTIVEfashion, we were lucky enough to have a studio with a big porch and spent a few afternoons bending LED leads to prep for sewing outside. We then moved indoors to do the programming and some soldering, hot gluing, and sewing machine-centeric parts of the projects.

Here’s a round-up of a few projects that can be made or used outdoors:

Know It All Programmable Felted Bag

Image via Craftzine

Image via Craftzine

This morning I met with a few friends to do a Brunch ‘n’ Sew, and iPhones were used as quick references for knitting charts. Why not skip the phone entirely and have your chart right in your bag? This is a great project to take with you when doing knitting on the go. I don’t knit, but seeing this project has really inspired me to try it out! [via Craftzine]

10-Minute Sewable iPod Remote

Image via Aniomagic

Image via Aniomagic

I love Aniomagic’s kits and components, they are easy to use and really fun (I used one of their learning sensors in my Temperature Sensing Coffee/Tea Sleeve Project). This project/kit would be great to take along on a picnic to make and use while hanging around outside. You can purchase the kit from their site or buy the materials separately. I like this because it really is ‘plug and play’: no programming/computers required, just sew and go!

Interactive Solar T-Shirt

Image via Kobakant 

Image via Kobakant 

This project is more about wearing out and about than making outdoors. So many soft circuit projects are about lights and battery power, it’s nice to mix it up with this solar powered piece. I especially like the flapping feather demoed in this tutorial.

Soft Circuit Kits Round-Up

When I first got interested in soft circuits, getting materials was a combination of ordering free samples and sourcing items on your own. Luckily in the last few years things have changed and there are a variety of kits available to get you started with e-sewing. Back in December, Becky @Craftzine did a nice Holiday Gift Guide for getting started in wearables that included some must-have items like conductive thread, a multimeter, and the LilyPad Arduino. I’ve decided to gather up info on some LED sewing kits that I’ve found so you can pick the one that suits you best. Scroll down for a chart comparing them w/ details on what’s included in each individual kit.

StitchLits

Image via KateHartman.com

Image via KateHartman.com

Kate Hartman offers the StitchLits LED Sewing Kit on her Etsy store. It is a nice little set to get you started with sewing LEDs, I especially like the way it is packaged in a little tin. There is even a needle and needle threader included so you can literally get started as soon as you open the package!


SternLab LED Sewing Kit

Image via Sternlab.org

Image via Sternlab.org


Becky Stern’s kit is available at the Makers Market and her Etsy shop. Another nice starter kit, she also includes your choice of colors for the LEDs (red, green, blue, white, or yellow). Becky has a great video tutorial on using the kit for those of us who like to watch, rather than read, instructions. She also has a downloadable pattern if you’d like to use the design she demos.


Aniomagic’s Beginning & Intermediate Kits

Images via Aniomagic.com

Images via Aniomagic.com

Aniomagic has lots of great little modules for creating interactive and electronic crafts. I like how they divided the kits into levels, a very basic beginner kit and then an intermediate kit with some more goodies. And the packing is so much fun! (Can you tell I’m a sucker for great product packaging?) Again, lots of good tutorials and ideas can be found at this site, as well as a great shopping experience.


LilyPad E-Sewing Kit

Images via Sparkfun

Images via Sparkfun

The LilyPad has an official e-sewing kit available at both MakerShed and Sparkfun, which includes some LilyPad LED boards (very easy to sew and look pretty sturdy) and LilyPad Button Boards. The great thing about this kit – you get a whole spool of conductive thread (75 yds).


Comparison Chart

Name Where to Buy Price Conductive Thread LEDs Battery Battery Holder* Extras Instructions
Aniomagic Beginner’s Sewing Kit Aniomagic $5.00 ~2 yds (1) LED Sequin (1) 12.5 mm CR1216 coin cell Fabric Battery Holder n/a Beginner Kit
Aniomagic Intermediate Sewing Kit Aniomagic $15.00 ~3 yds (2) LED Sequins (1) 12.5 mm CR1216 coin cell Fabric Battery Holder Fabric Push Switch, Tilt Switch, 3x4in Fabric Swatch Intermediate Kit
SternLab LED Sewing Kit MakerShed Etsy $15.00 2 1/3 yds (7ft) (2) 5mmColor: Red, green, blue, white, or yellow (your choice) (1) 20mm CR2032 coin cell Coin Cell Holder Snap LED Sewing Tutorials
StitchLits Etsy $20.00 3 yds (3) LED Sequins Color: White (1) 20mm CR2032 coin cell Coin Cell Holder Needle, Needle Threader, Snap How to Sew StitchLits Instructable
LilyPad E-Sewing Kit Sparkfun MakerShed $49.35 $39.95 75 yds (1 spool) (5) LilyPad LEDsColor: Bright White (2) 20mm CR2032 coin cell Coin Cell Holder (3) LilyPad Button Boards
*it looks like most of these kits use the same type of coin cell holder…

LilyPad Arduino


LilyPad Arduino system image by Leah Buechley (via Flickr)

LilyPad Arduino system image by Leah Buechley (via Flickr)

Before the LilyPad, if you wanted to incorporate a microcontroller into fabric projects you either had to create your own socket or hide a breadboard somewhere in the piece. When I was working with Rebecca on our REACTIVEfashion project, we used Arduino Minis on tiny breadboards hidden in pockets, sleeves, and purses.

The LilyPad evolved from Leah Buechley’s experiments with fabric PCBs. Her handmade, flexible fabric PCBs were absolutely stunning, but not easily mass-produced. She collaborated with SparkFun Electronics to create the LilyPad Arduino hardware which has been available for sale since October 2007. The LilyPad now comes as a kit with a variety of sewable modules such as LEDs, sensors, and battery holders. Leah has an introduction to the LilyPad on her site which walks you through the programming interface and set up if you are new to Arduino.

LilyPad prototype image by Leah Buechley (via Flickr)

LilyPad prototype image by Leah Buechley (via Flickr)

Right now I have the main board, usb adapter, an LED module, AAA battery board (though it is a bit bulky for my tastes), and a temperature sensor. My favorite module so far has to be the LiPower, which is enables you to incorporate a rechargable Lithium Polymer battery into your LilyPad project. Can’t wait to order more of the accessories and play!

Here are some tutorials and projects using the Lilypad:

The LilyPad also has it’s own Flickr group – a great place to check out what other people are doing with it.