See You at Boston Mini Maker Faire!

This weekend has been all about preparing for the Boston Mini Maker Faire. I have been gathering up all the projects I want to bring, getting some fresh batteries, and making some fun stuff for my booth. Here is the felt banner I made to put over my table.

While packing up my projects and doing a bit of spring cleaning, I came up with the idea of a portable scrapbook/notebook as a better way to house all my favorite techniques, prototypes, components and samples. I really enjoy the computational sketchbooks and electronic pop up books that Leah Buechley’s High-Low Tech research group have created as a way to demonstrate paper computing techniques. Why not make my own using the soft circuit materials I have on hand? It is a great alternative to digging through tool boxes, bins, and drawers when I need something specific.

Inspired by textile sample books, I decided to use a three ring binder with removable pages as a storage solution for my ‘must have’ items. This way when I want to bring some samples along to an event like the maker faire or the NH Media Makers meet up, I can easily toss it in my bag and head out the door. The most important thing to me is that the components and parts are functional within the pages themselves. Here are a few pages I have made so far:


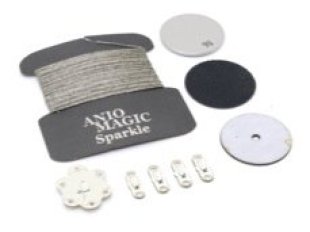
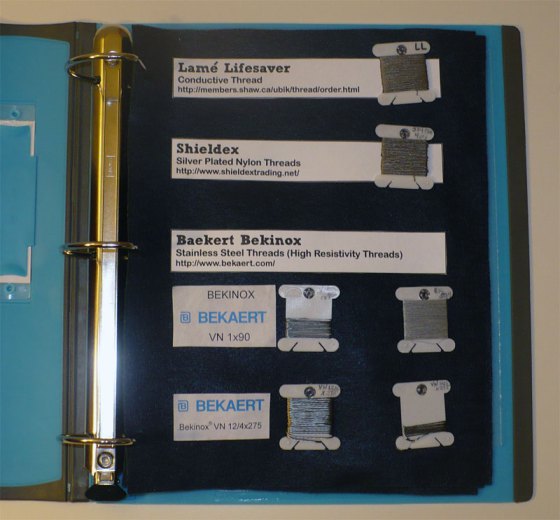
The thread page has bobbins that I attached with snaps, I can remove them to show others or to grab a small sample to take if I want to sew outdoors or at a craft group. The Bekaert threads came in ziplock bags and giant cones, so I am really happy with this alternative storage.

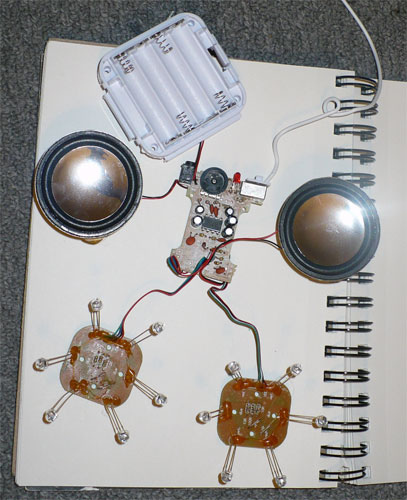
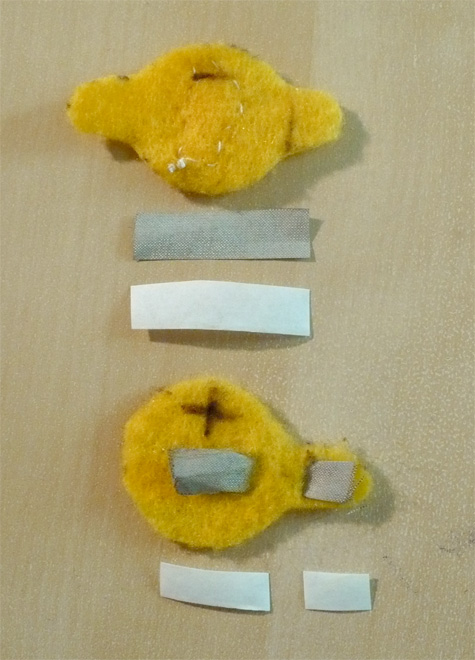
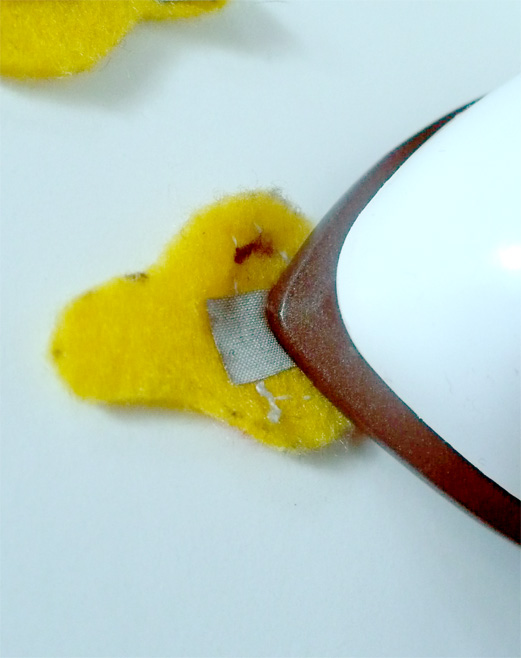
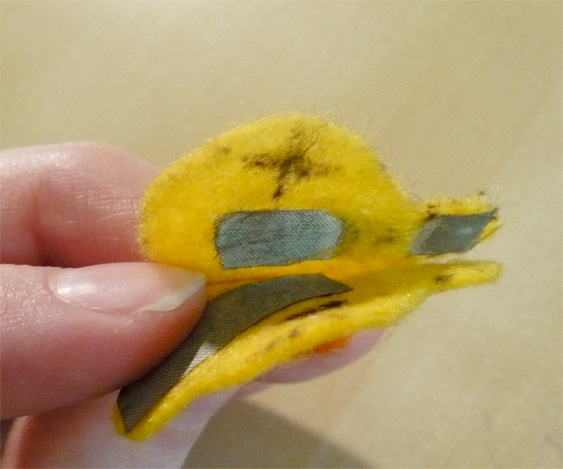
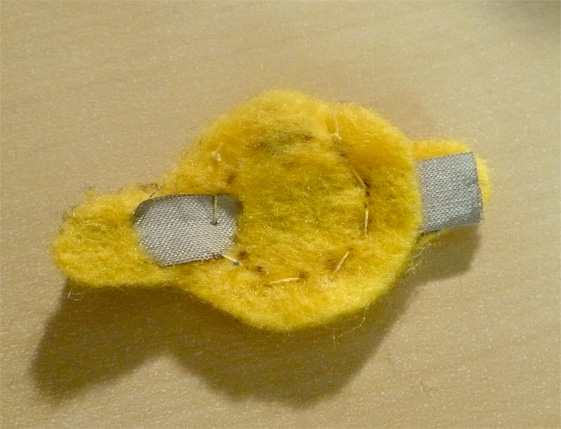
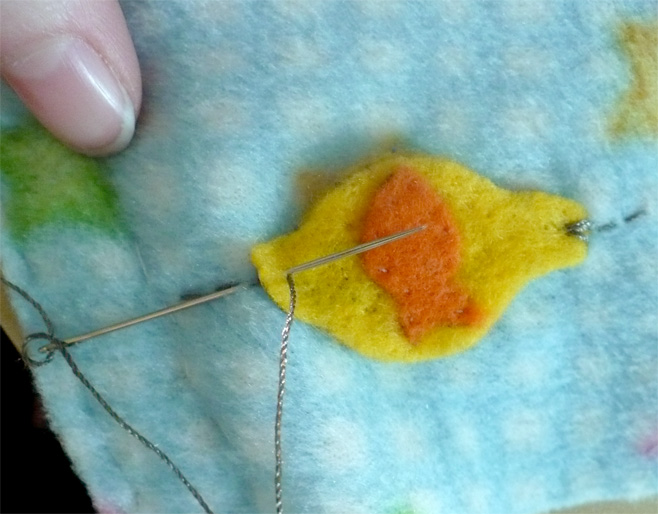
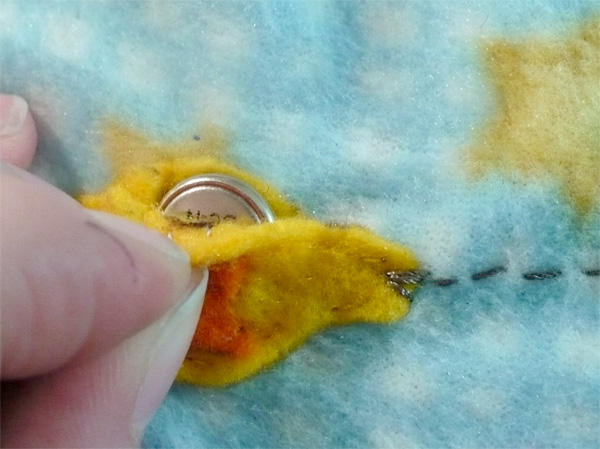
The battery holder page has two of my favorite methods for making soft coin cell holders. I attached one finished/functional holder with elastic loops (on the left), and then an exploded view to show how the pieces work and are constructed. Seeing them side by side is good for a quick reference of techniques.

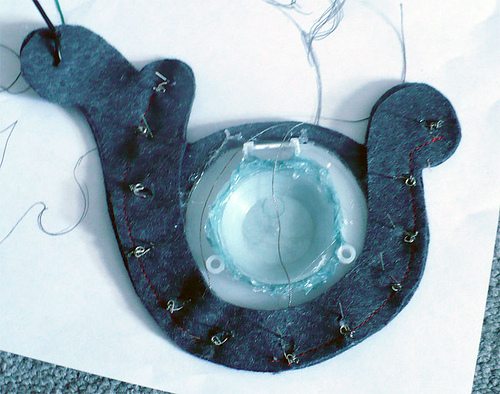
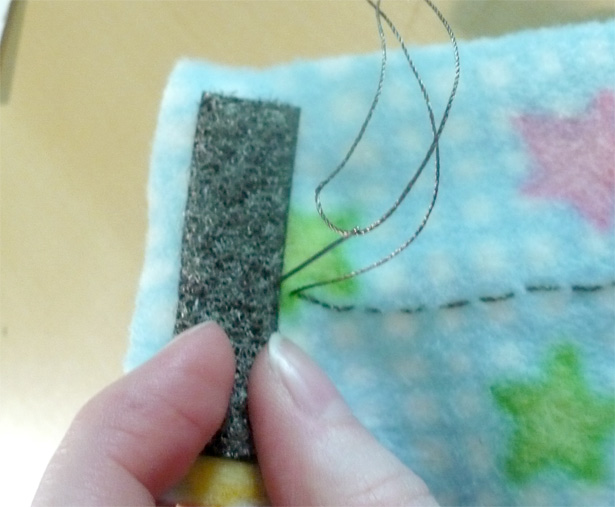
The zipper page (in progress) is the first of the more interactive pages. This is an example of a digital zipper sensor technique created by Joo Youn Paek that I made into a module by sewing on neoprene and metal snaps. The module can attach to the page for a quick demo and then removed for prototyping a project. This particular zipper was a little hard to work with, so I’m going to try and find one with bigger teeth so that the conductive thread doesn’t interfere as much with the motion.

Soft Circuits Outside

The last couple of weekends have been surprisingly warm and sunny for April in New Hampshire, so I’ve been trying to spend as much time outside as possible. At first I thought this would directly compete with my goal to work on soft circuit projects, but there are a lot of things you can take outdoors and piece together while enjoying the weather. When I was working on REACTIVEfashion, we were lucky enough to have a studio with a big porch and spent a few afternoons bending LED leads to prep for sewing outside. We then moved indoors to do the programming and some soldering, hot gluing, and sewing machine-centeric parts of the projects.

Here’s a round-up of a few projects that can be made or used outdoors:

Know It All Programmable Felted Bag

Image via Craftzine

Image via Craftzine

This morning I met with a few friends to do a Brunch ‘n’ Sew, and iPhones were used as quick references for knitting charts. Why not skip the phone entirely and have your chart right in your bag? This is a great project to take with you when doing knitting on the go. I don’t knit, but seeing this project has really inspired me to try it out! [via Craftzine]

10-Minute Sewable iPod Remote

Image via Aniomagic

Image via Aniomagic

I love Aniomagic’s kits and components, they are easy to use and really fun (I used one of their learning sensors in my Temperature Sensing Coffee/Tea Sleeve Project). This project/kit would be great to take along on a picnic to make and use while hanging around outside. You can purchase the kit from their site or buy the materials separately. I like this because it really is ‘plug and play’: no programming/computers required, just sew and go!

Interactive Solar T-Shirt

Image via Kobakant 

Image via Kobakant 

This project is more about wearing out and about than making outdoors. So many soft circuit projects are about lights and battery power, it’s nice to mix it up with this solar powered piece. I especially like the flapping feather demoed in this tutorial.

Boston Mini Maker Faire

The first Boston Mini Maker Faire is happening on Saturday April 24 from 12-4pm. Come and meet some Boston Area makers sharing and demoing their projects as part of the Cambridge Science Festival. I’ll be there with some of the weekend projects that I share on this blog.

I first found out about the faire through Dorkbot Boston and am so excited that there is going to be an event so close to me. Though I am going to be flying out to San Francisco next month for the big Bay Area Maker Faire, I am going as a spectator and not demoing, so it’s nice to have the opportunity involved in one of these events as a participant. This will definitely be less overwhelming than two full days of makers!

I’ll be bringing my LED Jellies, Temperature Sensing Coffee/Tea Sleeve, and my Drawdio Puppet along with me if anyone local wants to stop by and play with them. I just placed an order for some parts for the light up necklace I was working on last week, so that might make it into the mix as well.


Project: Sound Reactive Necklace

This weekend was the annual RPM Challenge Listening Party. I was inspired the afternoon before to make a project to wear there. Though it was a little too ambitious of me to expect to get something functioning for the event with only a few hours of prototyping/design time, I did have fun and got a good start on a little soft circuit necklace hack. I brought the work-in-progress along to share with friends at one of the listening parties and worked on some the sewing bits while enjoying the musical selections of evening.

Rather than try to build my own circuit from scratch, I went to a toy store and found this little ‘light show’ speaker on sale that pulses to the beat of your music. It was great place to start and after tearing it apart the board was small enough for me to incorporate into a wearable object.

Here’s a video I took before I started pulling it apart:

I used some wool felt and pieces of the original plastic casing to build a necklace form that I sewed the LEDs into. My first test was to translate the original circuit and function into something soft and interesting for me to wear.

I cut out the speakers because I want to use ambient sound (originally the loud tunes at the party) and will be working on a way to hook up a microphone as an input. Here’s a video of it after I placed everything and tested it out with the original mp3 input.

There are a few other adjustments I’m going to make, now that I’m not on such a short deadline, such as switching out the LEDs (they are a little too bright and multicolored for my tastes), adding a soft battery pack w/ coin cells, and an on/off button. Right now the board is hot glued into the piece and is a little bulky because of the capacitors. Stay tuned as I continue prototyping and the project evolves.

Fun with Drawdio!

Ever since I first saw the Drawdio, I have been itching to buy one and put it in some sort of wearable project. It is a nice little synthesizer that has a lot of potential. I absolutely love the ‘OK2Touch‘ jacket that Drawdio creator Jay Silver made – it is such a fun interaction!


This week I purchased the Drawdio Fun Pack from Adafruit to play with and spent Saturday night stitching it into a quick prototype. I brought it to today’s NH Media Makers meet-up and it was a big hit!

Originally it was going to be a strange hat, but I couldn’t get a good connection with my conductive fabric to my forehead, so it morphed into a little hand puppet. I soldered some snaps onto the Drawdio board’s contacts so I could detach it from the fabric jellyfish/squid creature. Inspired by the ‘Unruly,’ a project from Makezine that uses resistors and pennies to make a little keyboard, I used conductive fabric patches and resistors to make musical tentacles. They also snap on/off for easy prototyping and I’m going to add different resistor values to make a variety of pitches/scales. Here’s a quick video, it still needs a few finishing touches, but it is fun to play around with so far.

There are lots of things I’d like to try with this method, and hopefully I’ll have some time in the future to refine the design and make an Instructable out of it. There are a few more pics of the building process over at my flickr account.

Soft Circuit Kits Round-Up

When I first got interested in soft circuits, getting materials was a combination of ordering free samples and sourcing items on your own. Luckily in the last few years things have changed and there are a variety of kits available to get you started with e-sewing. Back in December, Becky @Craftzine did a nice Holiday Gift Guide for getting started in wearables that included some must-have items like conductive thread, a multimeter, and the LilyPad Arduino. I’ve decided to gather up info on some LED sewing kits that I’ve found so you can pick the one that suits you best. Scroll down for a chart comparing them w/ details on what’s included in each individual kit.

StitchLits

Image via KateHartman.com

Image via KateHartman.com

Kate Hartman offers the StitchLits LED Sewing Kit on her Etsy store. It is a nice little set to get you started with sewing LEDs, I especially like the way it is packaged in a little tin. There is even a needle and needle threader included so you can literally get started as soon as you open the package!


SternLab LED Sewing Kit

Image via Sternlab.org

Image via Sternlab.org


Becky Stern’s kit is available at the Makers Market and her Etsy shop. Another nice starter kit, she also includes your choice of colors for the LEDs (red, green, blue, white, or yellow). Becky has a great video tutorial on using the kit for those of us who like to watch, rather than read, instructions. She also has a downloadable pattern if you’d like to use the design she demos.


Aniomagic’s Beginning & Intermediate Kits

Images via Aniomagic.com

Images via Aniomagic.com

Aniomagic has lots of great little modules for creating interactive and electronic crafts. I like how they divided the kits into levels, a very basic beginner kit and then an intermediate kit with some more goodies. And the packing is so much fun! (Can you tell I’m a sucker for great product packaging?) Again, lots of good tutorials and ideas can be found at this site, as well as a great shopping experience.


LilyPad E-Sewing Kit

Images via Sparkfun

Images via Sparkfun

The LilyPad has an official e-sewing kit available at both MakerShed and Sparkfun, which includes some LilyPad LED boards (very easy to sew and look pretty sturdy) and LilyPad Button Boards. The great thing about this kit – you get a whole spool of conductive thread (75 yds).


Comparison Chart

Name Where to Buy Price Conductive Thread LEDs Battery Battery Holder* Extras Instructions
Aniomagic Beginner’s Sewing Kit Aniomagic $5.00 ~2 yds (1) LED Sequin (1) 12.5 mm CR1216 coin cell Fabric Battery Holder n/a Beginner Kit
Aniomagic Intermediate Sewing Kit Aniomagic $15.00 ~3 yds (2) LED Sequins (1) 12.5 mm CR1216 coin cell Fabric Battery Holder Fabric Push Switch, Tilt Switch, 3x4in Fabric Swatch Intermediate Kit
SternLab LED Sewing Kit MakerShed Etsy $15.00 2 1/3 yds (7ft) (2) 5mmColor: Red, green, blue, white, or yellow (your choice) (1) 20mm CR2032 coin cell Coin Cell Holder Snap LED Sewing Tutorials
StitchLits Etsy $20.00 3 yds (3) LED Sequins Color: White (1) 20mm CR2032 coin cell Coin Cell Holder Needle, Needle Threader, Snap How to Sew StitchLits Instructable
LilyPad E-Sewing Kit Sparkfun MakerShed $49.35 $39.95 75 yds (1 spool) (5) LilyPad LEDsColor: Bright White (2) 20mm CR2032 coin cell Coin Cell Holder (3) LilyPad Button Boards
*it looks like most of these kits use the same type of coin cell holder…

Project: Embedded Musical Toys

Today my partner and I were at a thrift store and found some great little electronic instruments in the toys section. Thrift stores are one of my favorite places to go for inspiration and great hackable finds. He was looking for some interesting sound-making objects to use in an album he’s creating with his band Winterstar for this year’s RPM Challenge and found this awesome keytar:

I fell in love with this little musical toy because of the LED matrix in the center. I love tearing apart toys and gadgets to play with them (I had fun using an RC car as the basis for my Tween Voodoo project).

Over on Instructables there are a couple cool little projects using toy pianos bykobakant. Hacking and reconstructing these toys for a new interaction is a great learning exercise – so I’m going to try it out for myself. I don’t do a lot with sound in my projects so I think it will be a fun exploration.


Wearable Piano Interface (via Instructables)

Though the guts of my toy are a little bulky for a wearable interface, I think it’d be interesting in a pillow or maybe even as part of aslipcover for our couch. Unfortunately I am without a soldering iron at the moment for the fun stuff, but in the meantime I am pulling this thing apart and watching Ask an Engineer Live Chat from Adafruit Industries.

LilyPad Arduino


LilyPad Arduino system image by Leah Buechley (via Flickr)

LilyPad Arduino system image by Leah Buechley (via Flickr)

Before the LilyPad, if you wanted to incorporate a microcontroller into fabric projects you either had to create your own socket or hide a breadboard somewhere in the piece. When I was working with Rebecca on our REACTIVEfashion project, we used Arduino Minis on tiny breadboards hidden in pockets, sleeves, and purses.

The LilyPad evolved from Leah Buechley’s experiments with fabric PCBs. Her handmade, flexible fabric PCBs were absolutely stunning, but not easily mass-produced. She collaborated with SparkFun Electronics to create the LilyPad Arduino hardware which has been available for sale since October 2007. The LilyPad now comes as a kit with a variety of sewable modules such as LEDs, sensors, and battery holders. Leah has an introduction to the LilyPad on her site which walks you through the programming interface and set up if you are new to Arduino.

LilyPad prototype image by Leah Buechley (via Flickr)

LilyPad prototype image by Leah Buechley (via Flickr)

Right now I have the main board, usb adapter, an LED module, AAA battery board (though it is a bit bulky for my tastes), and a temperature sensor. My favorite module so far has to be the LiPower, which is enables you to incorporate a rechargable Lithium Polymer battery into your LilyPad project. Can’t wait to order more of the accessories and play!

Here are some tutorials and projects using the Lilypad:

The LilyPad also has it’s own Flickr group – a great place to check out what other people are doing with it.

Project: Temp Sensing Coffee / Tea Sleeve

Last weekend I came down with a bad cold, so no circuit projects for me. However drinking a ton of tea gave me some inspiration for this week’s experiment – a coffee cup sleeve that warns you when your drink is too hot. I don’t know how many times I have been burned by super-hot green tea, so here is my fun little solution to that problem.

I’ve been wanting to play around with sensors, and while surfing the net one day I came across Aniomagic’s Learning Sensors. They are nice little sewable sensors that come in a few different varieties. The temperature one caught my eye because it is self-contained and you don’t need to hook up any external microcontrollers to play around with it.

Aniomagic's Temperature Sensor (image via Aniomagic.com)

Aniomagic's Temperature Sensor (image via Aniomagic.com)


Aniomagic even has a cool tutorial for a temperature sensing coaster, which I ended up adapting for my coffee sleeve idea.

Aniomagic's Smart Coaster Project (image via Aniomagic.com)

Aniomagic's Smart Coaster Project (image via Aniomagic.com)


For my project I used my favorite little bipolar LEDs from Electronic Goldmine as the eyes for a fleece Penguin. The temperature sensor is hidden behind his belly and lights the LEDs red if the temperature is higher than my calibrated preference, and green when it is ‘just right’. Once the temperature drops lower than my preference, the LEDs turn off. There is a 3rd output that I could have hooked additional LEDs to, but I liked the simple red/green communication as I am more concerned with the higher temps than my beverage being too cold.

This was a fun little project to wire up and I’m happy with the design. After testing it I found that the sensor needed to be pressed right up against the cup or it lost the reading, this can be solved by placing your fingers right on the penguin to keep the tension. I tried it out on some green tea, and I think I’ll bring it along on my next visit to my local coffee shop and see how it does with different beverages.

Check out some progress shots and details of construction below and on my Flickr account.

Project: Soft Circuit Business Card

Inspiration…

Last month I was brainstorming some redesign ideas for my website & branding and really got hooked on alternative/extreme business cards. I searched around to see if there were any electronic ones and here are some really cool projects I dug up:

Image by Tom Ward (via Instructables)


Tom Ward of LightBox Technology has made some Instructables for an autodialing cardflashlight card, and a dot matrix card.

Evil Mad Scientist Laboratories makes some nifty Business Card Breakout Boards.


Image via Adafruit

Image via Adafruit

Another great PCBbusiness card as posted on the Adafruit Industries Blog.

Results…

Tonight I sat down and played around with some felt I had hanging around and made a fabric ‘business card’ prototype. I used a CR1216 battery & holder I had left over from making LED bracelets awhile back, which I like because they are a lot smaller than CR2032s. I made little flower sequins out of bipolar LEDs and sewed them to a top layer of felt and then to some pushbuttons made with conductive fabric . The bottom felt is some really stiff stuff I got from the dollar storewhich makes a great cardstock-like backing for structure. The text on the front is my nickname; the design is how I used to sign my art projects when I was a teenager, so it’s a little fun piece of nostalgia. When you press the buttons, the LEDs light up, the right button makes red, the left makes green, and pressing both at the same time will make an orangey-yellow.


Check out some more images on my flickr page.